Thursday, July 18, 2019

Work at Home with Gogokid!

Teach English online and earn up to $25 per hour! Apply to be a Gogokid teacher and teach on your own schedule via this link: https://teacher.gogokid.com/?channelId=344&referralId=9G6GUPX3.
Related image
Maybe you just graduated college and are looking for a job, need another part-time position to make ends meet, a stay at home mom, or just want to keep building your resume. Whether the reason, you can start working from home in just a few short weeks and get decent pay doing it if you start working for Gogokid.

Now what is Gogokid?! Gogokid is a platform that you teach children, ages 3-12, english online from the comfort of your own home. You are teaching children mainly from Beijing, but recently the company expanded to teach in Japan and Korea! The only requirement in applying is that you have a Bachelors degree. It doesn't matter how much teaching experience you have or whether you have teaching credentials. I was hired within a few weeks and only had just a few months of tutoring experience and a bachelors degree in Recreational Management. 
Image result for gogokid
How much will I get paid!? Based on your experience or credentials, you can request a higher starting rate but the base is $7 per 25 minute class, which is $14 an hour! I was able to start at $8 a class but in just a few months I was making $10 a class. Their raises is based on a point system which is one of the reasons I have loved working for Gogokid. Each completed 25 minute class, or 5 star parent review, you get one point. Penalties like teacher cancelation or absence results in points taken away. If given enough penalties it will eventually lower your pay rate, but I love that it doesn't immediately effect it especially if you have emergencies come up. You also still get paid 60% if a student does not show up for the scheduled class, which is great!

When do I teach? With Gogokid you have the opportunity to open time slots 12am-7am, and 7pm-11:30pm. You get to set how many hours, what days and how often you want to teach a lesson. However if you actually want students to book you, the peak times are M-S 5am-6:30am and Sat-Sun 12am-1:30am, 8pm-9:30pm. Because of this flexibility it has been great to simply just not teach on holidays, my birthday, or days that you are feeling sick!

What will I be teaching!? Gogokid has created amazing curriculum already created for you to teach your students. They are all basic reading and comprehension skills the students need to develop in order to understand the english language. They are animated lessons that you and the students gets to interact with and are very fun! 
Have any TIPS!? For the interview (where you will teach a lesson to a Gogokid trainee) and while teaching classes it is important to remember to speak slowly and clearly so that the student can understand and hear what you are saying so they can repeat correctly. You also need to use 2-3 props per lesson in order to engage and teach the student more successfully. It is also important to use your hands to talk to the student, as they may not know any english. For example cupping your ear when you want them speak and repeat after you. Another suggestion is have a fun, but not too busy background so your "classroom" is inviting. 

I hope you take the opportunity to start teaching online today by clicking here! It has been such a rewarding, fun and creative process with each new student and lesson. The students will definitely capture your heart!
Wednesday, May 8, 2019

Watercolor Thank You Cards


A while back I posted a DIY on how to make a cool watercolor background just using cheap watercolors and a Ziplock bag (find the post here).  In that tutorial I used the watercolors to make a cute name tag for my friend, but I recently used the remaining backgrounds for thank you cards. I also sent one of them to my mom for mother's day. With just a Sharpie, card stock and some glue, I was able to create a beautiful and unique card! I mounted the watercolor directly to the card after it was completely dry and lettered. Here are some photos for inspiration on how to use your watercolor backgrounds!

Wednesday, April 3, 2019

LDS Conference Activity Pages

The Church of Jesus Christ of Latter Day Saints General Conference is just around the corner! I was at a friends house when their ministering brothers came over to remind and invite them to watch General Conference this weekend. It sprung the idea to invite my mini sisters to do the same but with a fun activity packet for their kids! So here are the different downloads, links and websites I used to print out a simple yet adorable activity book for adults or children!
Before we get started, here is a quick link to watch General Conference live this weekend, April 6th and 7th, 2019 https://www.lds.org/?lang=eng.

Most of the pages I put into the personalized packet came from the LDS Church that are available for free on their website. Here is the link to their own LDS Packet, Conference Squares, and listening coloring sheets https://www.lds.org/general-conference/activities-for-children?lang=eng along with a preview below.

I also downloaded and printed LDSconf BINGO and other coloring pages. I used to color and then play BINGO throughout the whole conference as a kid, and still find myself wanting to do it today because it is so fun! Here are some printouts that I have for LDSConf activities, click on the google drive links so you can save and download the PDF easily.
GENERAL CONFERENCE BINGO
https://drive.google.com/file/d/0B5LrPZ_0f2QGSi1ueWw0dkNhdHZsOHlyS3dOZkVWU2taajJF/view?usp=sharing

LDS CONFERENCE BINGO
https://drive.google.com/file/d/0B5LrPZ_0f2QGUEJSVnp3LXFBbnp3T3EwVTJpV0NUeHJCai1z/view?usp=sharing

GENERAL CONFERENCE TIC TAC TOE
https://drive.google.com/file/d/0B5LrPZ_0f2QGNFNUMi1vR0pPVGE4Wi1wNVdocS1EcmZwbFlv/view?usp=sharing

MY LDS CONFERENCE BOOKLET SHEETS
https://drive.google.com/file/d/0B5LrPZ_0f2QGdkhTa0ZVT1VqS1VmU3ZNMkhsZXByREZid1JB/view?usp=sharing

GENERAL CONFERENCE COLORING PAGE
https://drive.google.com/file/d/0B5LrPZ_0f2QGVTQ1RlgtTW9najFpZFVBVW85Y3Q4M1U5aTE4/view?usp=sharing

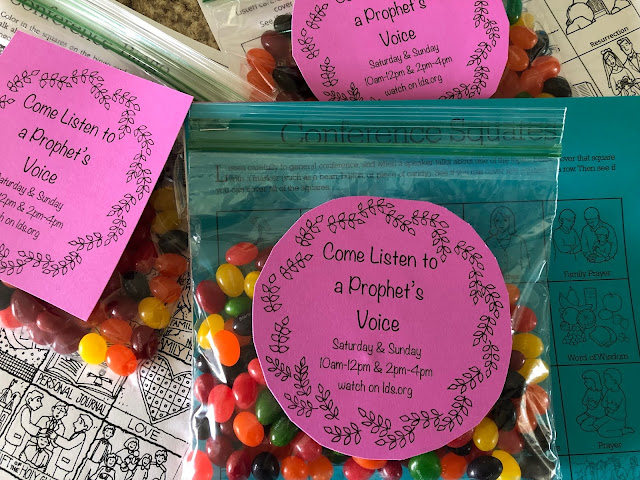
When putting the packet all together I added a bag of Jelly Beans that they could use as markers for the BINGO games and stapled it to a simple invitation I designed for my mini sisters to watch conference. I have a link for you to print out this invitation as well which is in clipart form. I try not to use colored ink, and just printed them on fun colored card stock.
https://drive.google.com/file/d/0B5LrPZ_0f2QGb0VzMDRxUXdGc2tzbVRxcXd0RG4xQmlMb2xj/view?usp=sharing
HAVE A HAPPY CONFERENCE!


Tuesday, March 19, 2019

Easy Peasy Granola

I love eating granola with yogurt as it is a healthy and delicious snack or breakfast! Buying bags of granola can become pretty pricey though, so heres a cheaper way to get that satisfying crunch.
Ingredients:
10 cups of oats
1 cup of coconut oil (or canola)
1 cup of honey
1 tsp of vanilla
1/2 tsp of cinnamon
1/2 tsp of salt

Preheat oven to 350. Mix all ingredients in a large bowl, ensuring a good coating of oil and honey on all the oats.

Spread 1/2 of the mixture evenly onto a cookie sheet lined with a non stick surface such as parchment or silicone mat. (This recipe can be easily cut in half which will make about one cookie sheet of granola.) Bake for about 15-20 minutes or until tops of granola are slightly golden.
Let granola cool for about 10-15 minutes then simply break apart and store in an airtight container. Enjoy your delicious granola!

Monday, March 4, 2019

Homemade Salsa

I love salsa and feel like we are always running out of it and buying more. I recently browsed through a couple salsa recipes online and came up with this easy, non chunky, restaurant style salsa! All you need is a blender!
Ingredients:
1 (10oz) can of diced tomatoes & green chillies
1/4 of a small yellow onion
2-3 slices of pickled jalapeños
1 tsp of garlic
1 tsp of cumin
1-2 shakes of salt and pepper to taste
1/4 bunch of cilantro (optional)
Place all ingredients in order in a blender and pulse for about 10-15 seconds or until desired consistency. Let salsa settle in blender or other container and enjoy! This recipe is so versatile you can use purple onion, powered, fresh or pickled garlic, or as much cilantro as you'd like! I promise it will taste delicious no matter what!

Thursday, February 28, 2019

Easy Watercolor Backgrounds

Watercolors are one of my absolute favorite kinds of art and crafts. The colors are always so soft and beautiful, but sometimes it's hard to achieve this type of look if you are a beginner. Here is a super simple and easy trick to creating gorgeous water color backgrounds for any occasion or craft! You'll need a set of watercolors (mine are the cheap ones we had in grade school), a spray bottle, a ziplock bag, and a paint brush.
The first step is picking out the right kind of paper. Because we are using watercolors, it would be best to use a lighter color of paper that is thick like card stock or scrapbooking paper. The paper I used for this project was not as thick as card stock and a cream color. Next is to get started on painting! For this trick we are going to paint on the ziplock bag (sandwich or gallon depending on the size of your paper and desired background). Paint in a consistent line or pattern, switching hues or colors without overlapping them as shown below.

The next step is to take the spray bottle and spray at least 1-2 sprays of water onto the paper you want your background on. Then flip the ziploc bag onto the wet paper and water the colors spread and mix! For this step you can manipulate and move the colors around with your finger to achieve the desired look. Next take the ziplock bag off of the paper and let dry. You can reuse the ziplock bag just by wiping off the watercolors with a dry cloth and painting it again. Below are several different colors and patterns I tried (the colors are still wet, and will look better when dried.)

Once the paper dries feel free to try again with different colors, write a cute phrase, gift or keep as a personalized craft! I used this project to create a name tag/ label for someone and mounted it on card stock for extra sturdiness. I hope you enjoy this easy way to be crafty and look like a pro at watercolors! #doodledart for me to see your creations!


Thursday, February 21, 2019

Thursday Clothing Deals

Here are links to cute clothing I've found today! These are all daily deals and will only last a day or two with limited quantity, so get it while you can. Enjoy these finds!

Boyfriend Tie Tees: Comes in many colors and is such a cute a lightweight top for spring! Get it here: http://shrsl.com/1gmrx

Cushioned Collar Sneakers: These are such a staple for spring! I am so excited to start to wear lightweight, comfy and cute shoes! Get it here: http://shrsl.com/1gms7

Bubble Sleeve Tunic: Comes in three colors and has free shipping! Get this deal before its gone! Get it here: http://shrsl.com/1gmt9

Floral Baseball Tees: Super cute for under $20! Quarter sleeve with elbow patches- whats not to like!? Get it here: http://shrsl.com/1gmt1

Striped Tee: This top is another under $20 and is such a staple in anyones closet! Get it here: http://shrsl.com/1gmto

Bold Strip Modest Dress: This dress is so flattering and can I say the perfect Easter dress? Get it here: http://shrsl.com/1gmtw

Thursday, February 14, 2019

Peanut Butter Kiss Cookies

These cookies are so delicious and SO EASY! They make for a quick and sweet treat for holidays and parties! I made these for my husband for Valentines Day and used dark chocolate kisses instead of milk, as dark chocolate (and peanut butter) is his favorite.
Here's the recipe:
1 package of Betty Crocker Peanut Butter Cookies
1 egg
3 T water
2 T oil
1/2 cup sugar
about 40 Hersey Kisses

Make the Peanut Butter Cookies according to the package adding the contents, egg, water and oil to a mixing bowl. I mixed mine in my Kitchen Aid for under 5 minutes, until the batter was slightly sticky. Next preheat the oven to 375 and use your hands to roll the batter into balls. If you want bigger cookies, each ball should be about an inch wide making 24 balls. If you want smaller cookies, roll about 36 balls making them around a 1/2 inch wide. (Look at the photos to see how the smaller balls turned out!)

Next place the sugar in a bowl or flat container and gently coat each peanut butter ball, then transfer to a greased or silicon lined baking sheet. If making bigger balls, place them in the oven for 8 minutes. If making smaller balls, place them in the oven for 6 minutes.

While the cookies are baking, unwrap Hersey Kisses and set aside. Once the cookies are done, take them out of the oven and press a Hersey Kiss into the middle of each cookie. Let the cookies sit for about a minute before transferring to a cooling rack.
If you want the Kisses more melted, or if using dark chocolate Kisses, place back in the oven for 30-45 seconds, then take out to cool. Best eaten within 15-20 minutes while the chocolate is still soft! Enjoy!


Saturday, February 9, 2019

Valentine's Day Craft

Here is a simple and cheap Valentine's Day craft you can do with kids or just on your own to add some love to your home!
Heart Chain
Supplies needed:
Construction or scrapbooking paper
Scissors
Stapler

First step is to cut long strips of colorful paper. With this particular project I did not use a straight edge cutter and just eyeballed it with scissors, and it turned out just fine! I tried to cut the strips about 1/2 - 1 inch in width.

Next is making your first heart to start the chain. Fold one strip of paper in half, creasing the fold. Then fold to to ends down creating a heart shape and use a staple to hold shape in place. See image below.

Then to add onto the chain simply fold and crease the next strip of paper and loop it through your previously made heart. Fold the two ends down to create the heart shape, staple, and repeat.

Make the chain as long as you'd like and place around a door frame, on the table, around a bookshelf or simple hang as a banner. This is such a cute, fast and festive way to decorate for Valentine's Day!